Thursday, October 27, 2011

M8 Greyhound - Lower Hull & Suspension

At this point, the drive shaft assembly was attached to the lower hull. The kit tires were left attached and the entire unit was set on the tires to ensure that everything touched the ground. The front shock absorbers, lower rear torsion bars, front springs, and transfer case brush guard were then attached. The only fit problem encountered so far was the left front spring interfering with the steering linkage (see arrow in photo below). I'm not sure where the misalignment originated, but as a result, the steering linkage has a slight bow . . . not suited for competition, but, oh well.

To finish the undercarriage, the four rear shock absorbers, muffler and exhaust pipe assembly, and rear suspension support were added. A drill bit and pin vise were used to open the end of the exhaust pipe.

The front plate had six ejector pin marks. These were sanded out even though I later realized that the aftermarket interior plate would cover them. The two tow clevis attachments were added to the front plate and then the assembly was joined to the front of the hull. There were no issues with the fit.

The rear hull plate has two holes which must be opened if you wish to attach a first aid case in a later step. I left them closed. The two tow clevis attachments and tow pintle plate were added to the rear hull plate and the assembly was then attached to the rear of the hull, again with no fit issues.

After a final clean-up and check of the work to-date, it'll be time to tackle the interior--lots of added detail for that area! Here's a photo of the left side showing the work up to this point:


Tuesday, October 25, 2011

M8 Greyhound - Drive Train

Step 2 consists of building the drive shaft assembly. The drive shaft unit is molded in one piece to which were added the transfer case cover; front, middle, and rear axle covers; the steering mechanism; and the left and right steering ball covers.

At this point I constructed the kit tires/wheels. I am not planning on using them on this kit but they are important in the next step to ensure that the wheels all touch the ground properly when this assembly is attached to the tub. The kit tires are built using interior poly caps which, while they leave a lot to be desired when building tank models, are rather convenient here allowing the tires to be snugly slipped onto the axles.

I also decided not to leave off the fenders so additional detail in the wheel wells was not added.

M8 Greyhound - Initial Hull Construction

In this step the hull floor has been added to the hull tub and the rear suspension plates and main drive shaft have been attached. Several ejection marks on the tub (both exterior and interior) have been sanded flat . . . probably more than necessary but being unfamiliar with this kit better to be safe than sorry!

Saturday, October 8, 2011

M8 Greyhound - AMPS CV Group Build

For its group build project, AMPS Central Virginia chose Tamiya’s 1/35th scale U.S. M8 Greyhound Light Armored Car. We commenced the build with an introductory session in August and are scheduled to wrap it up in March 2012. Members can build the model straight out-of-the-box or can add any of the numerous available aftermarket accessories.
I have the base kit, the Aber PE set, Royal Model PE/Resin set and 37mm turned metal gun barrel, and the Hussar wheel set with chains. I’m ready to begin construction but am unsure at this point exactly which vehicle to model or even which nationality. Luckily I have some time before having to make that decision. I’m thinking about leaving off the fenders but that will entail adding some scratch-built details to the lower hull and suspension. All I know for sure at this point is that I will NOT add an engine compartment and engine. Those hatches can stay closed up!

Friday, October 7, 2011

M8 Greyhound - The Real Deal

The 6x4 wheeled M8 light armored car was the only armored car used by the U.S. Army in combat during World War II. While its initial development was slated for the Tank Destroyer force, it wound up being used by cavalry reconnaissance squadrons. Development of the M8 began in 1941, the prototype was produced by the Ford Motor Company in June 1942, and over 8,500 were manufactured between March 1943 and April 1945. While the M8 was mainly used in Europe, it also saw service in the Pacific. The M8 was supplied to both Britain and France and it was the British who nicknamed the M8 the “greyhound.” Many countries around the globe continued to use the M8 well after the end of World War II.
The M8 had a Hercules JXD rear-mounted, water-cooled engine capable of producing 110 HP and the transmission had a 4-speed forward/1-speed reverse gearbox. Its six-wheel configuration made it a stable vehicle. The steel-plated body armor ranged in thickness from 19mm-32mm and the open-topped turret had 19mm armor. Armament consisted of a turreted 37mm M6 main gun, a coaxial .30-cal machine gun, and a pintle-mounted .30-cal machine gun.

Wednesday, September 21, 2011

Krupp Protze - The Kit


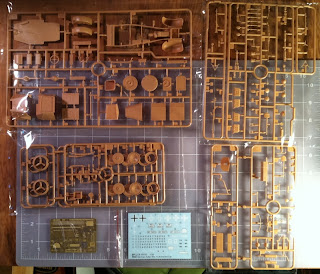
Or, rather, one of the kits. I have the older Tamiya Krupp in 1/35 scale but this new kit is produced by Dragon in 1/72 scale--approximately half the size of the scale in which I'm used to working. The version depicted in this kit is the Kfz.70 personnel transport. Even so, the kit includes a 3.7cm PaK 35/36 that can be built either being towed or separately in firing mode. No figures are included. A full chassis is represented and all the small, fiddly parts such as vehicle tools and suspension are separately cast.

Wednesday, September 7, 2011

German Adler Kfz.13 - Initial Interior Construction

Initial work on driver's seat, gear shift, emergency brake, and PE plate for machine gun mount. The interior is wide open, calling for the addition of several detail parts.

German Adler Kfz.13 - Initial Frame Construction

Addition of front & rear leaf springs, drive shaft, and rear axle. The engine is only represented by the lower half as the front of the vehicle is closed up. Still need to add PE braces inside front fenders then front axle.

German Adler Kfz.13 - The Kit

As with the real vehicle, color schemes and markings are extremely limited. Three are shown in the instructions: Unit Unknown, Poland, 1939 (Overall German Gray); Unit Unknown, France, 1940 (Overall German Gray); and Unit Unknown, Training, Germany, 1937 (German Gray/Red Brown/Olive Green/Flat Yellow camouflage).
Five sprues in Bronco's usual tan styrene plus one sheet of PE and one of decals. In addition to the specific markings shown in the instructions, the decals also include complete number series and blank registration plates allowing you to assign virtually any number to your armored car. (Next time I'll first remove the individual bags!)

Tuesday, September 6, 2011

German Adler Kfz. 13 - The Real Deal

The Kfz.13 light armored car was one of the first armored vehicles built in Germany after World War I. In 1932, the Adler Werk produced their "Standard 6" car chassis with an armored body designed and built by Deutsche Edelstahl AG in Hanover. The 8mm armor was sufficient to protect the crew of two (driver and gunner) from small arms fire. Its sole armament was a light machine gun, such as the MG13 or MG34. These vehicles were extensively used in Nazi propaganda movies of the 1930s and some saw action in Poland and France. Production ended in 1934 and by 1939 they had been largely replaced by the Sd.Kfz.221/222 series. Note the lack of markings and an apparent crew of three.

German PzKpfw. II - The Kit

This is Tamiya's 1/35th scale kit of the Ausf. C. Markings are included for three vehicles: Two from the 35th Pz Reg, 4th Pz Div, Warsaw, Poland, 1939 and one from the 33rd Pz Bat, 4th Lt Div, Poland, 1939. As all three are in German panzer gray, I'm planning on modeling a Pz II C from North Africa, most likely one from the 3rd Pz Rgt, 15th Pz Div, allowing me to finish it in German "desert" yellow (actually yellow brown/sand yellow). Modeling a North African Pz II will also let me add armor and other accoutrements that were retro-fitted in the field. I plan to document these additions/changes as I get to them in the build.

German PzKpfw. II - The Real Deal

The Panzerkampfwagen II (also known as the Panzer II and abbreviated PzKpfw II) was the common name for a family of German tanks used in World War II. Although originally designed as a stopgap measure due to delays in production of the Panzer III and Panzer IV, it nonetheless went on to play an important role in the early years of World War II. Production began in 1935 and it was largely removed from front-line combat by the end of 1942. The Panzer II saw service during the German campaigns in France, Poland, the Low Countries, Denmark, Norway, North Africa, and the Eastern Front.

The Ausf. C became the standard production model from June 1938 through April 1940 and was the most widespread version of the Panzer II. Early versions of the Ausf. C have a rounded hull front but many were later up-armored by bolting extra armor on the turret front and hull front. Some were also retro-fitted with commander’s cupolas. Many field modifications were also performed.

The main armament was a 2cm KwK 30 L/55 gun and a coaxial 7.92mm MG34 machine gun. The Panzer II Ausf. C carried a crew of 3. The driver sat in the front hull. The commander sat in the turret and was responsible for aiming and firing the guns. The loader/radio operator stood on the floor of the tank under the turret.

Krupp Protze - The Real Deal


The Krupp Protze was a six-wheeled German truck used extensively by German forces during World War Two on the Eastern Front and in North Africa, France, and Sicily. Commonly called “The Boxer,” it was mass-manufactured between 1933 and 1942. Powered by the Krupp M 304 four-cylinder engine, it generated 55 hp (the L2H43, 1933-36) or 60 hp (the L2H143, 1937-42). Total production was approximately 7,000 units.
While its main purpose was to tow artillery, especially the PaK 36, it was also used to transport infantry and for other utility uses:
  • Kfz.19 – Telephone truck
  • Kfz.21 – Staff car
  • Kfz.68 – Radio mast carrier
  • Kfz.69 – Standard configuration for towing the 3.7cm PaK 36
  • Kfz.70 – Standard configuration for personnel transportation
  • Kfz.81 – Ammo carrier conversion for 2cm Flak gun, usually towed
  • Kfz.83 – Generator carrier for anti-aircraft spotlight, usually towed
  • Sd.Kfz.247 Ausf. A – Armored personnel carrier, six-wheeled version. Only twenty built in 1937 before production went to Daimler-Benz who built the Ausf. B four-wheeled version in 1941 and 1942.
Sometimes the anti-tank (3.7cm PaK 36) and anti-aircraft (2cm Flak) guns were mounted directly to the bed of the truck.


Yep, I'm Moving My Projects

After experimenting with Facebook, I've decided to do what I intended from the outset--to post all of my modeling projects and other sundry observations here in this one blog. Check back as things progress here.

Gabriel Allon, Master Assassin

Late last year I happened to pick-up a copy of The Rembrandt Affair, the latest book in Daniel Silva's Gabriel Allon series, and was immediately transfixed. After finishing it I immediately read, in order, the first nine books in the series and then re-read number ten. There is a post on Silva's Facebook page that very few series/characters can stand up to such a compressed reading, and I totally agree. Silva has deservedly been placed on par with John le CarrĂ© and has been called by many his generation’s finest writer of international intrigue and one of the greatest American spy novelists ever.

As a VERY brief introduction, Gabriel Allon is an agent/assassin for the Office, the intelligence agency for the State of Israel. He is recruited following the Munich massacre from his vocation as an artist, and his expertise as a world-class art restorer features prominently in several of the books.

Within the series there are two internal trilogies. The first consists of The English Assassin, The Confessor, and A Death in Vienna and together they examine what Silva calls the "unfinished business of the Holocaust." The English Assassin deals with Nazi art looting and the actions (and inactions) of Switzerland during World War II. The Confessor addresses the role of the Roman Catholic Church, in general, and Pope Pius XII, specifically, during the Holocaust. A Death in Vienna is centered around Gabriel's attempt to bring to justice a Nazi war criminal, one whom his mother encountered on the Death March from Auschwitz in 1945.

The second internal trilogy consists of Prince of Fire, The Messenger, and The Secret Servant and deals with terrorism in the modern world. Prince of Fire explores the roots of Palestinian terrorism through a story of revenge, The Messenger takes a hard look at the role Saudi Arabia played in creating al-Qaeda and its affiliates, and The Secret Servant surveys the rise of militant Islam in Europe.

Silva has constructed the series so each book stands alone, but suffice it to say that the reader will get much more from the series if the books are read in order. The series is full of deep and colorful characterizations and it is these characters and their special relationships that help to give these stories their high degree of intensity.

The books in order:
  1. The Kill Artist
  2. The English Assassin
  3. The Confessor
  4. A Death in Vienna
  5. Prince of Fire
  6. The Messenger
  7. The Secret Servant
  8. Moscow Rules
  9. The Defector
  10. The Rembrandt Affair
  11. Portrait of a Spy
Silva has written three other spy novels which I'll discuss in a later post.

If you're looking for page-turners to keep you up until all hours, these are for you!

A Blog . . . Why?

Good question! Since retiring approximately four years ago, I have repeatedly heard the question, "Now that you're retired, what do you do with all your free time?" My favorite answer is, "Now that I'm retired, I don't know how I had the time before to work !" The days do fly by, filled with doing whatever it is I want to do whenever I feel like doing it.

I've contemplated starting blogs in the past. At first, I was going to document my wooden model ship builds. Then with another, I was going to document various plastic World War II-era armor-related models. My daughter suggested the title "Fossil Knows Best" for a blog I thought about starting to record various and sundry rants and raves. Then, how about a place to discuss the books which I seem to be reading more and more? Hmmm, why not combine them all into one hodgepodge of things that keep me busy and mostly out of trouble?

So, here you have "Fossil Knows Best" . . . Enjoy!